


Upgrading Cisco 7940 Firmware to SIP
February 28, 2014
So, you picked up a few cheap Cisco 7940s on eBay with the hopes of using SIP and Asterisk, but you don’t really feel like using Call Manager Express (mainly because you don’t want to drop more money on a router). You Google around for firmware upgrade instructions, only to find that the vast majority of “tutorials” are completely unhelpful, wrong, or missing some critical component of the process. Yeah, I did that too.
These instructions were created after hours of trying to understand firmware upgrading on the 7940s. I captured packets, messed with files, and distilled my frustrations into (what I hope is) a comprehensive article. Your mileage may vary based on the firmware you have installed and the firmware you are upgrading to, since Cisco seems to mess with this process a lot (because, you know, why would we even dream of being consistent?). However, the basic idea behind the upgrade is fairly simple:
- Configure a DHCP Server with Option 150 for TFTP.
- Configure a TFTP server to serve the configuration and firmware files. I recommend TFTPD32.
- Create an XMLDefault.cnf.xml file with the load information and place it in the TFTP directory.
- Boot the phones and watch the magic happen. Switch the firmware between SCCP and SIP a few times, just to see how magically easy it is when the instructions actually work.
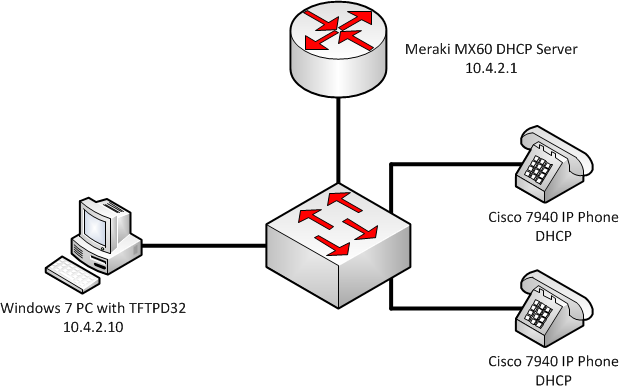
Before we get down to business, here’s the topology that I used for this tutorial:
Step 1: Configure a DHCP Server with Option 150 for TFTP.
There are many different DHCP servers that you can use to accomplish this process, but I just used the one on my Meraki MX60. The server must be able to serve an IP address and DHCP option 150 to the phones. Option 150 specifies the TFTP server that the phones will use to obtain their configuration and firmware. TFTPD32 also includes a DHCP server, but I have not used it.
Step 2: Configure a TFTP server to serve the configuration and firmware files.
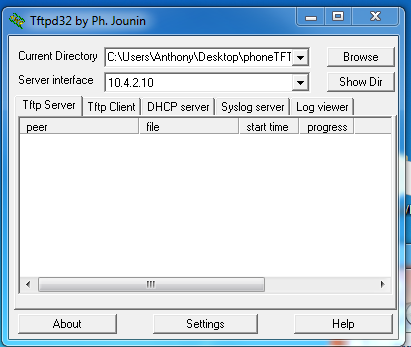
I recommend using TFTPD32 since it’s simple and easy to set up on Windows. Download and install the software, then launch it. Set the “Current Directory” to whatever directory you will use to serve the config and firmware files out of. Set the server interface to whatever interface is associated with the phone network. My TFTPD32 looks like this:
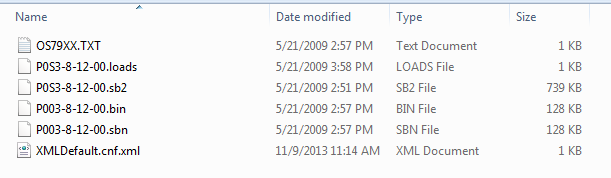
The directory for my TFTP server (C:\Users\Anthony\Desktop\phoneTFTP) looks like this:
Let’s take a quick minute to discuss some of the files that are in here.
- OS79XX.TXT – This is just a one-line file that specifies the firmware to load. In this case, the only line in the file contains “P003-8-12-00” without the quotes. This file was included when I downloaded the firmware.
- XMLDefault.cnf.xml – This will specify the firmware version for the phone. Theoretically, that’s the job of OS79XX.TXT. However, since Cisco and external documentation either conflict or vary by firmware here, I’ve included both.
- The rest of the files are the firmware for the phone.
You can obtain firmware files through the official Cisco portal, assuming that you are a Cisco customer. You certainly can’t obtain them from a simple Google search for your phone and the needed firmware.
Step 3: Create an XMLDefault.cnf.xml file with the load information and place it in the TFTP directory.
The XMLDefault.cnf.xml file does the magic here. I’ve included a sample of what mine looks like here. When the phone boots, it will request this file. We are interested in the “” line. This line tells the phone the version of firmware that we want to install. As you can see, my loadInformation line looks like this:
P0S3-8-12-00
Notice that there is no extension after P0S3-8-12-00. From here, the phone can request its firmware from the TFTP server.
Step 4: Boot your phones
Plug in your phones and perform a factory reset on them. Consult official Cisco documentation to find the specific instructions for factory resetting your phone. I used these instructions for my 7940. Once the phone boots, it will request an IP and the TFTP server address from the DHCP server. It will then download the XMLDefault.cnf.xml file from the tftp server and compare the loadInformation against the currently installed firmware. When it realizes that they are different, it will request all of the necessary firmware files from the tftp server. If you are using TFTPD32, you should be able to observe this process in the GUI.
The phone should reboot a few times during the upgrade. When it’s finished booting, there should be a small SIP logo in the upper-right corner of the phone. Congratulations! Despite mountains of conflicting Cisco documentation, hours of sifting through blog-posts written in other languages, and almost giving into the desire to throw your Cisco phone out the window, you now have a fully functioning SIP phone! Now edit that XMLDefault.cnf.xml file for Skinny and see how easy it is to switch back.
Previous article: Getting around paid in-flight Wi-Fi
Next article: Voice and XMPP: Integrating Asterisk with ejabberd