


Voice and XMPP: Integrating Asterisk with ejabberd
April 2, 2014
My current home voice system consists of an Asterisk virtual machine, two Cisco 7940 IP Phones running SIP firmware, and a Google Voice number that is handled by Asterisk. Clearly, I was lacking in the home telephony department, so I decided to try finding some neat things to do with my setup. That’s when I decided to learn about XMPP, unified communications, presence, synergy, communications enabled business practices, agile, methodologies, eXtreme programm…Oops, my bad. I get a little carried away with the buzzwords. But seriously: the idea of integrating Asterisk with XMPP, presence, and instant messaging seemed cool to me. It would give me the opportunity to learn a new technology (XMPP) while building my knowledge of Asterisk.
Overview
With the resolve to learn some new skills firmly set in my mind, I came up with a few simple goals for calls going to my phone’s extension. Here’s how the call should flow:
- Someone dials my extension (1001) with the intent to hear my beautiful voice on the other end of the phone.
- Asterisk obtains XMPP presence information from my XMPP server. I decided to use ejabberd. More on that later.
- If I am available (logged into IM on my Desktop computer and available), then send me an instant message with the caller ID and ring the IP phone on my desk.
- If I am unavailable (not logged into IM on my Desktop or not available), then drop into a different menu with other options (I’ll cover these in later blog articles). But also send me an instant message that says I missed a call. I’ll get this message when I log back in.
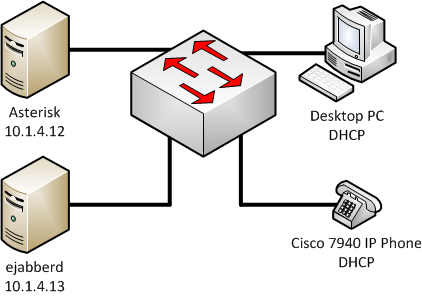
The topology that I used is below:
Overall, it’s a fairly simple topology (I’m actually simplifying it. It’s a bit more complex, but this works for our purposes). Let’s quickly discuss the elements of this setup:
- Asterisk – Asterisk 11.8.1 on CentOS 6.5. I obtained this as an AsteriskNOW distro.
- Ejabberd – The Erlang Jabber Daemon. This is used for instant messaging and XMPP. XMPP is the Extensible Messaging and Presence Protocol, and it is what we’ll be using for IM and presence information. It was originally called Jabber, and the two names are often used interchangeably. You’ll find me using both names throughout this article.
- Cisco 7940 IP Phone – This is exactly what it looks like. A 7940 running SIP firmware and connected to Asterisk. My extension is 1001.
- Desktop PC – This is my personal PC with instant messaging software on it. I’m running Pidgin for testing purposes, but it shouldn’t matter as long as you’re using something that talks XMPP.
Now that the topology is understood, let’s take a brief look at the steps necessary to make this all work:
- Install and configure ejabberd
- Add the necessary IM users to ejabberd
- Configure xmpp.conf to connect the res_xmpp Asterisk module to ejabberd
- Configure the dialplan to do cool stuff, like check presence and send instant messages
Step 1: Ejabberd Installation
I can’t really provide any particularly compelling reasons for why I chose ejabberd over other solutions, such as Openfire. Openfire is written in Java, which everyone tells me is a dumpster fire of a language. However, it appears to have some really cool features, and I intend to experiment with it at some point. At any rate, ejabberd seemed to have good documentation and a good community, so I decided to give it a try.
I would rather not reinvent the wheel when explaining how to install ejabberd on CentOS, since there is already a great tutorial here that I followed. However, I will provide a few pointers:
- Be absolutely sure to change the hostname of your box BEFORE you install ejabberd. Don’t rely on the CentOS installation GUI hostname box, since it seems to be useless. Actually change the hostname from the command line by editing /etc/sysconfig/network. I forgot to do this, and I tried changing the hostname after installing ejabberd. Either ejabberd or Erlang (I’m not really sure) then proceeded to light on fire, and I had to uninstall and reinstall the packages.
- If you’re just going to use the IP address of your ejabberd server for XMPP (ex: user@10.1.4.13), then be sure to list the box’s local IP address in the hostname section. This was my approach for the testing purposes of this article.
- Be sure to open the appropriate ports on your firewall.
- I’m not fond of the ejabberd configuration file format. Maybe I’m just getting used to it, but I find it a bit clunky.
Step 2: Adding Users
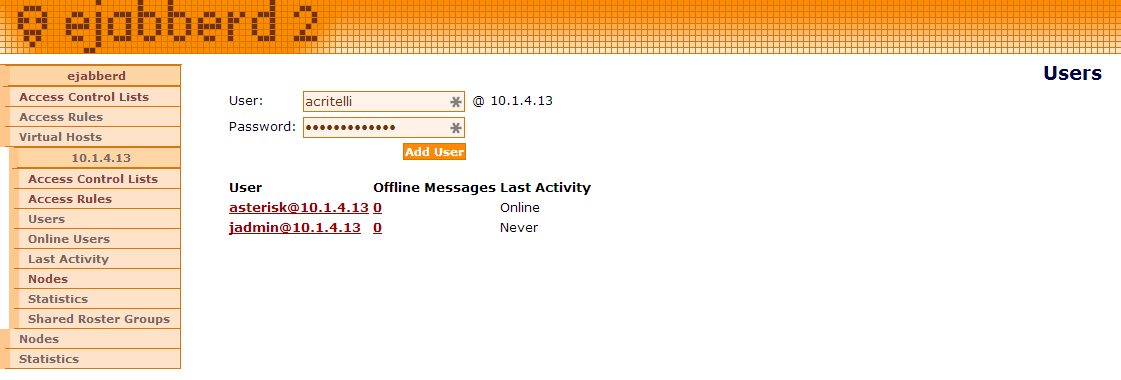
Next, we need to create the appropriate users for our setup. I’m creating two: “acritelli” and “asterisk.” Obviously, acritelli will be my personal messaging account. This is the account that Asterisk will use to send me messages and figure out if I’m available to take a call. The asterisk account will be configured in the Asterisk xmpp.conf file, which we’ll get to later.
Adding a user is pretty straightforward. Ejabberd comes with a nice web interface for handling this sort of stuff. In my topology, the URL for ejabberd is 10.1.4.13:5280/admin. Once logged in, users can be added by clicking on “Virtual Hosts,” selecting the appropriate virtual host, and clicking “Users.” New users can then be created by entering their username and password, and hitting “Add User.” It’s pretty intuitive, as you can see below:
Step 3: Edit xmpp.conf
Asterisk uses the res_xmpp module to communicate with an XMPP server. This module is configured via the /etc/asterisk/xmpp.conf file. The relevant section of mine is below. I’ll be explaining this in more depth, so don’t worry if it looks a bit confusing.
[general]
        autoregister=yes
        autoprune=no
[ejabberd]
        type=client
        serverhost=10.1.4.13
        username=asterisk@10.1.4.13
        secret=***************
        priority=1
        port=5222
        usetls=no
        usesasl=yes
        status=available
        statusmessage="It's Asterisk!"
        timeout=5
Let’s look at the general section first. The “autoregister” option tells the module to automatically load buddy list users into memory, and the “autoprune” option tells the module to not automatically remove users from the buddy list. This is pretty simple, and seems to be the generally recommended configuration for the general section based on various pieces of documentation.
Next, we define an account named “ejabberd.” The options are fairly straightforward, but let’s take a closer look so that we fully understand them:
- type=client – We’re configuring Asterisk as a regular client on the XMPP server using the account that was created on ejabberd.
- serverhost=10.1.4.13 – This is the address of the ejabberd server.
- username=asterisk@10.1.4.13 – This is the account for Asterisk that was configured during Step 2.
- secret=*********** – This is the password for the Asterisk user. I’ve censored it out here, but the configuration file contains the actual password created for the Asterisk user in Step 2.
- priority=1 – XMPP allows a user to be logged in from multiple “resources.” Priorities help to determine where a message is sent when a user is logged in from different resources. Since we’re only logging our Asterisk client in from one place, we can simply set this to 1.
- **port=5222 ** – This is the port that the XMPP module will connect to on the ejabberd server.
- usetls=no – I do NOT have TLS set up on ejabberd yet. This is something that you may wish to consider, as not using TLS poses a serious security concern. However, for this simple experiment, I didn’t feel the need to configure it. I have plans to implement TLS in the future, as it seems pretty straightforward on ejabberd.
- usesasl=yes – This enables SASL authentication, which ejabberd uses by default.
- **status=available ** – This sets the Asterisk user to “available.”
- statusmessage=”It’s Asterisk!” – This is the status message displayed by the Asterisk user. Anyone who adds the Asterisk user to their buddy list will see this status.
- timeout=5 – This tells the module to store incoming messages on the message stack for 5 seconds.
Once the xmpp.conf file has been configured correctly, the res_xmpp module can be restarted from the Asterisk console and connectivity can be verified with the “xmpp show connections” command, as seen below:
localhost*CLI> module reload res_xmpp
    -- Reloading module 'res_xmpp.so' (Asterisk XMPP Interface)
localhost*CLI> xmpp show connections
Jabber Users and their status:
       [ejabberd] asterisk@10.1.4.13     - Connected
----
   Number of clients: 1
Now that we have a happy XMPP connection to the ejabberd server, we can configure the dialplan to do cool things with presence and instant messaging.
Step 4: Configure the Dialplan
Connecting Asterisk to an XMPP server isn’t very useful without some code in the dialplan that harnesses the power of presence and messaging. The code below is the relevant section of my dialplan that implements the call flow described earlier. I’ll be explaining this line by line, so don’t worry if it looks confusing.
 exten => 1001, 1, Set(JSTATUS=${JABBER_STATUS(ejabberd,acritelli@10.1.4.13/Desktop)})
                same => n, GotoIf($[0${JSTATUS} = 1]?available:unavailable)
                same => n(available), JabberSend(ejabberd,acritelli@10.1.4.13,Incoming call from ${CALLERID(num)})
                same => n, Dial(SIP/TonyRoom)
                same => n, Hangup()
                same => n(unavailable), JabberSend(ejabberd,acritelli@10.1.4.13,"Missed call from ${CALLERID(num)}")
                same => n, Goto(TonyUnavail,s,1)
The first line, seen below, creates extension 1001 (the phone that sits at my desk) and starts the first step for this extension. I set the variable JSTATUS equal to the value returned by the JABBER_STATUS function. Let’s take a close look at the call to this function. The first argument is “ejabberd.” This is the Jabber account to use for the call, which was defined earlier in xmpp.conf. The next argument is my full Jabber ID (JID). A full Jabber ID contains a bare JID (acritelli@10.1.4.13), followed by a “/” and then followed by the resource name (Desktop). XMPP uses the concept of resources so that a single user can be logged in from multiple locations. In my case, I am using the Desktop resource, as this is the resource name that I configured in my Pidgin client. Notice that there is no space between the “,” and the JID. This is very important. If there is a space, JABBER_STATUS will assume that the space is part of the JID and attempts to gather presence information will fail. This spacing pitfall is important with many Asterisk functions, not just this one. Anyway, a call to JABBER_STATUS will return a numerical value based on the user’s availability. I am particularly interested in a return value of “1,” as this indicates that the user is available.
A quick note about JABBER_STATUS. Theoretically, you are supposed to be able to use a bare JID without a resource, such as “acritelli@10.1.1.13.” This does not work, as it will always return a status code of 7. A code of 7 indicates that the user is not available in the roster. Even with a full JID, such as “acritelli@10.1.4.13/Desktop,” a call to JABBER_STATUS will always return a code of 7 if the user is offline, even though it should return a value of 6. Both of these scenarios contradict the function’s documentation, and I have filed a bug with a more complete description of the issues that I found.
exten => 1001, 1, Set(JSTATUS=${JABBER_STATUS(ejabberd,acritelli@10.1.4.13/Desktop)})
The next line is a GotoIf statement. If the variable JSTATUS is equal to 1 (available), then go to the “available” priority. Otherwise, assume that the user is unavailable, and proceed to the “unavailable” priority. Notice that I place a “0” in front of JSTATUS. This guarantees that the comparison will always have a number, even if JSTATUS manages to be undefined for some reason.
same => n, GotoIf($[0${JSTATUS} = 1]?available:unavailable)
We’ll take a look at all three lines for the “available” priority below. First, use the JabberSend function to send an IM to the acritelli user. Let’s break this function down to gain a complete understanding of it. The first argument is the “ejabberd” account that was defined in xmpp.conf. The second argument is the JID of the user to send a message to. I use the bare JID of “acritelli@10.1.4.13” here to ensure that I receive messages irrespective of where I am logged into IM. However, you can also use a full JID with a resource. The third argument is the actual IM that should be sent. In this case, I simply indicate an incoming call with the caller ID. The second line dials the IP phone at my desk, and the third line is a Hangup() as a failsafe to ensure that Asterisk eventually exits out of this priority.
same => n(available), JabberSend(ejabberd,acritelli@10.1.4.13,Incoming call from ${CALLERID(num)})
                same => n, Dial(SIP/TonyRoom)
                same => n, Hangup()
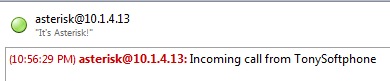
Successful execution of the “available” priority causes a message to be sent to me via IM, as seen below, and the IP phone at my desk rings.
Next, let’s take a look at the “unavailable” priority, as seen below. Remember that this priority will be called if my Jabber status is not equal to 1 (available). First, JabberSend will send me a message indicating that I have missed a call. The caller ID is included. Next, control of the call is passed off to the “TonyUnavail” context. This is a completely different section of the dialplan that I have configured to do various things when I am unavailable. I’ll be detailing that in a different blog post.
Note: You might wonder why I don’t just include the JabberSend call in the “TonyUnavail” context. My plan is to eventually do this, but I have it here for the demonstration purposes of this article.
   same => n(unavailable), JabberSend(ejabberd,acritelli@10.1.4.13,"Missed call from ${CALLERID(num)}")
                same => n, Goto(TonyUnavail,s,1)
Now when I log back into my IM client, I receive a message with information about the missed call, as seen below.
Conclusion
Integrating Asterisk and ejabberd was definitely challenging, as I started with only basic knowledge of Asterisk and absolutely no knowledge of XMPP or ejabberd. This article is the result of many hours of staring at configs, looking at packet captures, reviewing Asterisk console output, and bug hunting. I haven’t even scratched the surface of possibilities offered by Asterisk, ejabberd, or the XMPP protocol, but I’m looking forward to more projects that expand my knowledge of all three.
I’m really excited about the potential for integrating XMPP with Asterisk, and I fully plan on experimenting with more configurations. Again and again, Asterisk proves how it can be harnessed to write some very cool VoIP and unified communications solutions. Just having my phone ring when someone called me was way too boring, so I’m glad that I get all kinds of instant messages now. And I certainly can’t wait to figure out the next cool thing that I’ll be doing with my voice topology.
Previous article: Upgrading Cisco 7940 Firmware to SIP
Next article: Hacking VoIP: Decrypting SDES Protected SRTP Phone Calls